Docker is one of those tools that becomes useful very quickly once you start self-hosting. A huge number of apps ship with Docker instructions first, which means getting Docker working cleanly on Ubuntu saves you time on almost every project that comes after it.
In this guide, you will install Docker Engine on Ubuntu from Docker's official repository, confirm the service is running, test it with a container, and optionally set up your user account so you do not need sudo for every Docker command.
What Docker is, in plain English
Docker lets you run applications in containers. A container packages the app together with what it needs to run, while staying isolated from the rest of your system.
That matters for self-hosting because it makes deployments:
easier to repeat
easier to move between servers
less likely to break because of missing dependencies
Docker uses a client-server model:
the
dockercommand is the client you typethe Docker daemon (
dockerd) does the real work in the background
What you need before you start
Before you begin, make sure you have:
an Ubuntu system with a supported 64-bit release
a user account with
sudoaccessan internet connection
enough free disk space to download packages and images
At the time of writing, Docker's Ubuntu install docs list support for:
Ubuntu 26.04 LTS
Ubuntu 25.10
Ubuntu 24.04 LTS
Ubuntu 22.04 LTS
Docker also notes that Ubuntu derivative distributions such as Linux Mint are not officially supported, even if they sometimes work.
Important notes before installation
There are two beginner-friendly warnings worth reading first.
Docker can bypass some firewall rules
Docker's Ubuntu install docs warn that if you expose container ports, those ports can bypass ufw or firewalld rules.
That does not mean Docker is unsafe by default, but it does mean you should not assume a published container port is protected just because ufw is enabled.
Use the official Docker packages
Ubuntu can have older or unofficial Docker-related packages in its default repositories. Those can conflict with Docker's own packages.
For a clean setup, install from Docker's official apt repository instead of mixing package sources.
Step 1: Remove old or conflicting packages
If this is a brand-new machine, this step may remove nothing, and that is fine.
sudo apt remove docker.io docker-compose docker-compose-v2 docker-doc podman-docker containerd runc
Docker's docs specifically call out those packages as possible conflicts with the official install.
Note: Removing old packages does not automatically remove Docker images, containers, volumes, or networks that may already exist under
/var/lib/docker/.
Step 2: Update your package list
sudo apt update
Step 3: Install the packages needed to use Docker's repository
sudo apt install ca-certificates curl
Step 4: Create the apt keyring directory
sudo install -m 0755 -d /etc/apt/keyrings
Step 5: Download Docker's official GPG key
sudo curl -fsSL https://download.docker.com/linux/ubuntu/gpg -o /etc/apt/keyrings/docker.asc
Step 6: Make the GPG key readable by apt
sudo chmod a+r /etc/apt/keyrings/docker.asc
Step 7: Add Docker's official repository
sudo tee /etc/apt/sources.list.d/docker.sources <<EOF
Types: deb
URIs: https://download.docker.com/linux/ubuntu
Suites: $(. /etc/os-release && echo "${UBUNTU_CODENAME:-$VERSION_CODENAME}")
Components: stable
Architectures: $(dpkg --print-architecture)
Signed-By: /etc/apt/keyrings/docker.asc
EOF
This tells Ubuntu to install Docker packages from Docker's own repository for your current Ubuntu release and CPU architecture.
Step 8: Refresh apt again
sudo apt update
If Ubuntu can read the repository successfully, you should not see a signature error here.
Step 9: Install Docker Engine and the standard plugins
sudo apt install docker-ce docker-ce-cli containerd.io docker-buildx-plugin docker-compose-plugin
This installs:
Docker Engine
the Docker CLI
containerdthe Buildx plugin
the Docker Compose plugin
Step 10: Check whether Docker is running
sudo systemctl status docker
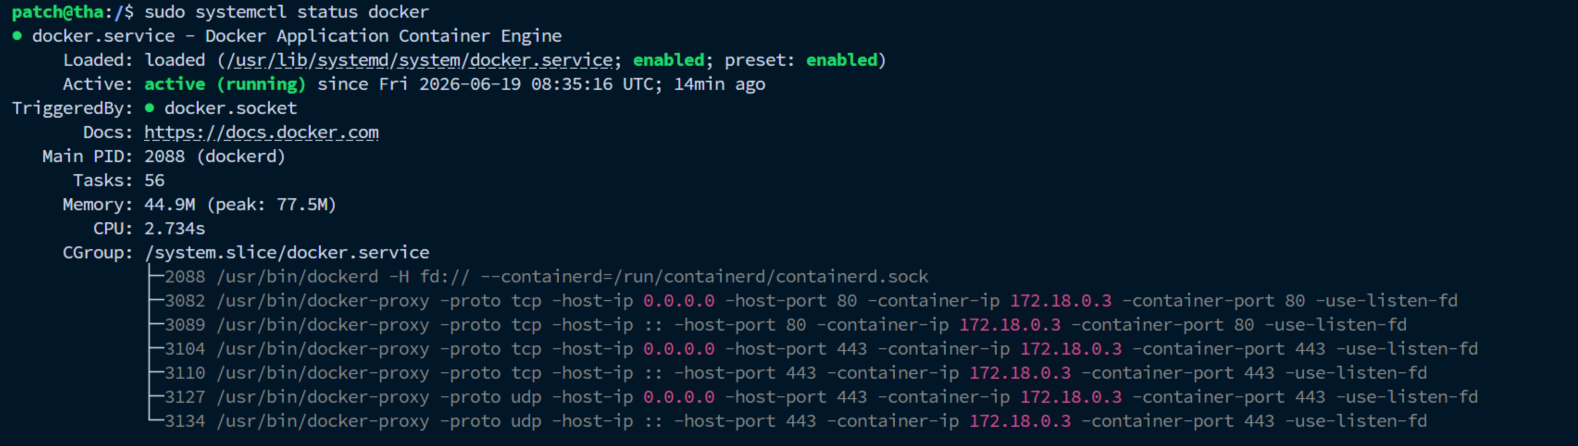
On Ubuntu, Docker normally starts automatically after installation. If it is not running, start it manually.
sudo systemctl start docker
You can also confirm that Docker is enabled at boot.
sudo systemctl is-enabled docker
A healthy result usually shows active (running) in systemctl status output.
Step 11: Run the hello-world test container
sudo docker run hello-world
This is Docker's standard first test. If it works, Docker will:
download the
hello-worldimage if it is not already localstart a short-lived container
print a success message
exit cleanly
That proves the client, daemon, image pull, and basic container runtime are all working.
Step 12: Check the installed Docker version
docker --version
You can also verify that the Compose plugin is available.
docker compose version
Optional: Run Docker without sudo
By default, the Docker daemon uses a Unix socket owned by root, so new users usually need sudo. Docker's post-install docs explain that you can use the docker group instead.
Important: Membership in the
dockergroup grants root-level privileges. Treat it like admin access.
Check whether the docker group already exists
getent group docker
On Ubuntu, the group is usually created during installation. If that command prints nothing, create the group.
sudo groupadd docker
Add your user to the docker group
sudo usermod -aG docker $USER
Apply the new group membership in your current shell
newgrp docker
On a desktop system or a normal SSH workflow, logging out and back in is often the cleaner option.
Test Docker without sudo
docker run hello-world
If you used sudo docker before switching to the group-based approach, you may hit a permissions warning related to ~/.docker/. Docker's post-install docs recommend fixing ownership like this:
sudo chown "$USER":"$USER" "$HOME/.docker" -R
sudo chmod g+rwx "$HOME/.docker" -R
Run one real container after installation
Once hello-world works, it helps to run something slightly more realistic. A simple test is Nginx in the background.
docker run -d --name nginx-test -p 8080:80 nginx
This does a few useful things at once:
downloads the
nginximage if neededstarts the container in detached mode
names it
nginx-testpublishes container port 80 on host port 8080
Now list running containers.
docker ps

Then check the container logs.
docker logs nginx-test
If you are on the Docker host itself, you can test the web server with:
curl http://localhost:8080
When you are done, remove the test container.
docker rm -f nginx-test
What success looks like
A successful install usually means all of these are true:
docker --versionreturns a version stringsudo systemctl status dockershows Docker runningsudo docker run hello-worldworksdocker compose versionworksyou can start and remove a real container such as
nginx
If you also completed the optional post-install step, docker run hello-world should work without sudo too.
Common problems and quick fixes
docker: command not found
This usually means the install did not complete correctly, or your shell session has not picked up the command path yet.
Try opening a new terminal session first. If it still fails, rerun the package install step and check for apt errors.
Docker service is installed but not running
Check the service:
sudo systemctl status docker
Start it if needed:
sudo systemctl start docker
If it still fails, inspect the logs:
sudo journalctl -u docker --no-pager -n 50
Permission denied when running Docker without sudo
That usually means your user has not picked up the docker group membership yet.
Apply the group in the current shell:
newgrp docker
Or log out and back in, then test again.
You use ufw and published ports do not behave how you expected
This is a common surprise. Docker's official Ubuntu install docs warn that published container ports can bypass ufw rules. If you are exposing services to the internet, read Docker's packet-filtering and firewall guidance before assuming your firewall policy still applies the way you expect.
Where to go next
Once Docker is installed, the next useful things to learn are usually:
how to run a container with persistent storage
how to use Docker Compose for multi-container apps
how to update containers safely
how to back up Docker volumes
For the very next step, Docker's own docs are worth bookmarking:
Final thoughts
Installing Docker on Ubuntu is not complicated, but doing it from the official repository is the important part. It gives you current packages, the standard plugins most tutorials expect, and a much cleaner starting point for self-hosted apps later.
Once this is done, you are ready for the part that is actually fun: using Docker to deploy something real.