
Gitea is one of the nicest ways to self-host Git without dragging a whole platform migration project into your weekend. It gives you repositories, issues, pull requests, releases, and a clean web UI in a package that is much lighter than the bigger forge stacks.
In this guide, you will deploy Gitea with Docker Compose on Ubuntu Server 24.04 LTS, keep its data persistent, open the web interface, finish the first-run install wizard, and make sure SSH clone URLs work the way you expect.
OS used in this tutorial
This walkthrough is written against Ubuntu Server 24.04 LTS.
That matters more than it sounds. The Gitea container steps themselves are mostly straightforward once Docker is running, but package availability, Docker installation paths, firewall defaults, service behavior, and small shell assumptions can differ between Ubuntu releases and between Ubuntu, Debian, AlmaLinux, Rocky Linux, and other distros.
If you are using a different operating system or even a different Ubuntu release, treat this guide as a close reference rather than a byte-for-byte promise.
Why Gitea is a good self-hosting fit
Gitea is a self-hosted Git forge written in Go. In practical terms, that means you get a private GitHub-style home for your own code, scripts, docs, and small team projects.
It is a strong first self-hosting app because it is:
lightweight enough for a small VPS
easier to run than some heavier developer platforms
useful for personal repos, homelabs, and small teams
flexible enough to grow into packages, actions, and more later
pleasantly fast, which is always nice when you are staring at commit history instead of tea leaves
Minimum and recommended server size
Gitea's Docker docs explain the deployment options, but they do not publish a simple beginner VPS sizing matrix for every use case. For a practical first install, these are reasonable starting points:
Minimum
1 vCPU
1 GB RAM
10 GB SSD storage
This is enough for a personal instance, light testing, and a small number of private repositories.
Recommended
2 vCPU
2 GB RAM
20 to 40 GB SSD storage
This is a better fit if you want room for more repositories, attachments, a few users, and less cramped breathing space during updates and backups.
If you plan to host a busy team instance, large binaries, container packages, or CI-heavy workloads, size above that and consider moving beyond the simple SQLite-first setup in this article.
What you need before you start
Have these ready first:
an Ubuntu Server 24.04 LTS VPS or VM
SSH access to that Ubuntu server
Docker already installed and working
the Docker Compose plugin available as
docker composea domain name if you already want cleaner URLs, though a server IP is fine for the first pass
If you want the prerequisites to line up cleanly with this guide, use the Ubuntu-focused Docker walkthrough first:
How to Install Docker on Ubuntu and Run Your First Container
Docker Compose for Self-Hosted Apps: A Beginner-Friendly Guide
Before you start
This guide uses the default rootful Gitea container and a simple single-container SQLite setup on Ubuntu Server 24.04 LTS. Gitea's Docker docs also cover a rootless image, but they explicitly note that the rootful and rootless image families are not compatible with each other. Pick one path and stick with it.
For a beginner deployment, I recommend keeping things simple:
web interface on port
3000Git over SSH on port
2222SQLite for the first install
a named Docker volume for persistent data
Why port 2222 for SSH? Because your server itself is probably already using port 22 for normal SSH logins, and trying to reuse it here is a fast way to invent avoidable problems.
Step 1: Connect to your server
Use SSH from your local machine.
ssh your-user@your-server-ip
Replace your-user with your Ubuntu username and your-server-ip with your server's public IP address.
Step 2: Create a folder for Gitea
sudo mkdir -p /opt/gitea
sudo chown "$USER":"$USER" /opt/gitea
cd /opt/gitea
Step 3: Create an environment file
This keeps the Compose file cleaner and makes the first-run URL settings easier to change later.
cat > .env <<'EOF'
TZ=Etc/UTC
GITEA_DOMAIN=YOUR_SERVER_IP
GITEA_ROOT_URL=http://YOUR_SERVER_IP:3000/
GITEA_HTTP_PORT=3000
GITEA_SSH_PORT=2222
EOF
If you already have a domain name ready, replace YOUR_SERVER_IP with that domain in both GITEA_DOMAIN and GITEA_ROOT_URL.
Step 4: Create the compose.yaml file
Save this as compose.yaml.
cat > compose.yaml <<'EOF'
services:
  gitea:
    image: docker.gitea.com/gitea:1.26.4
    container_name: gitea
    restart: unless-stopped
    environment:
      - TZ=${TZ}
      - GITEA__server__DOMAIN=${GITEA_DOMAIN}
      - GITEA__server__ROOT_URL=${GITEA_ROOT_URL}
      - GITEA__server__SSH_DOMAIN=${GITEA_DOMAIN}
      - GITEA__server__SSH_PORT=${GITEA_SSH_PORT}
    ports:
      - "${GITEA_HTTP_PORT}:3000"
      - "${GITEA_SSH_PORT}:22"
    volumes:
      - gitea_data:/data

volumes:
  gitea_data:
    name: gitea_data
EOF
What the important lines do
image: docker.gitea.com/gitea:1.26.4
This uses Gitea's official Docker image and pins the guide to the current stable release family that the latest research run surfaced. If you prefer a broader stable tag later, Gitea also documents tags like :latest and :1.
GITEA__server__ROOT_URL=${GITEA_ROOT_URL}
This makes Gitea generate links with the correct base URL. If this value is wrong, clone URLs and callback-style links can get weird in a hurry.
GITEA__server__SSH_PORT=${GITEA_SSH_PORT}
This tells Gitea to advertise the host SSH port you actually plan to use in clone URLs.
"${GITEA_SSH_PORT}:22"
This maps host port 2222 to port 22 inside the container. That container-side port is handled by the image's integrated OpenSSH daemon, which is the path Gitea's Docker docs show by default.
That means your host can keep normal SSH on port 22, while Git-over-SSH for Gitea comes in on host port 2222.
gitea_data:/data
This is the important persistent storage path. In this SQLite-first setup, it holds the repositories, attachments, configuration, and database files.
Named volume instead of a host bind mount
Gitea's Docker docs note that host-volume setups can need matching UID and GID permissions. A named volume keeps the first deployment simpler because Docker handles that part for you.
Step 5: Start Gitea
docker compose up -d
The first run may take a minute while Docker pulls the image.
Step 6: Confirm that the container is healthy
docker compose ps
If the service exits or restarts, check the logs.
docker compose logs --tail=100 gitea
If you see an error like listen tcp :22: bind: address already in use, the usual cause is enabling Gitea's built-in SSH server inside this Docker image. For this guide, do not set GITEA__server__START_SSH_SERVER=true. The image already includes its own OpenSSH service on container port 22, and the host-side 2222:22 mapping is enough.
You want to see the container staying up rather than bouncing around like it just remembered another meeting.
Step 7: Open the Gitea web interface
Visit the server in your browser.
http://YOUR_SERVER_IP:3000
If you used a domain in your .env file instead, open that URL instead.
On the first launch, Gitea should show its installation wizard.
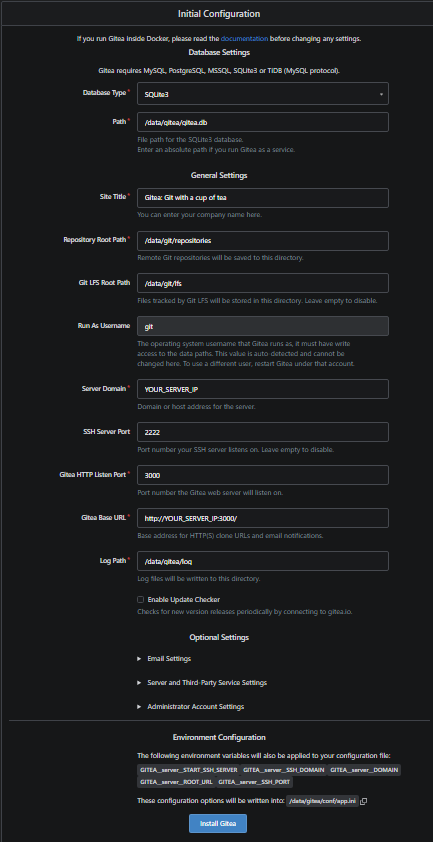
Step 8: Complete the first-run wizard
For this beginner-friendly setup, keep the database on SQLite3.
A few fields matter the most:
Site Title: anything you like
Repository Root Path: leave the container default unless you have a specific reason to change it
SSH Server Domain: your server IP or final domain
SSH Port:
2222Gitea Base URL: match the URL you actually used, such as
http://YOUR_SERVER_IP:3000/Administrator Account Settings: create your first admin user
Because the Compose file already sets the server URL values, a few of these fields may already look sensible when the page opens.
Once the form looks right, finish the install.
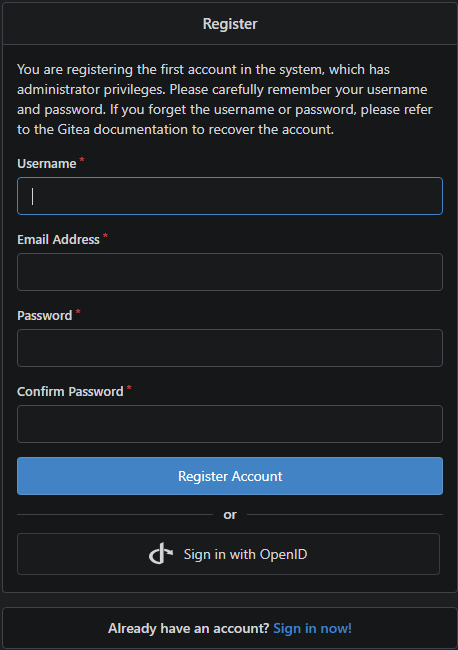
Step 9: Sign in and verify the instance
After the installer completes, sign in with the admin account you just created.
A healthy result usually means:
the dashboard loads normally
you can open the admin area
the instance shows the correct base URL
repository clone options include SSH on port
2222
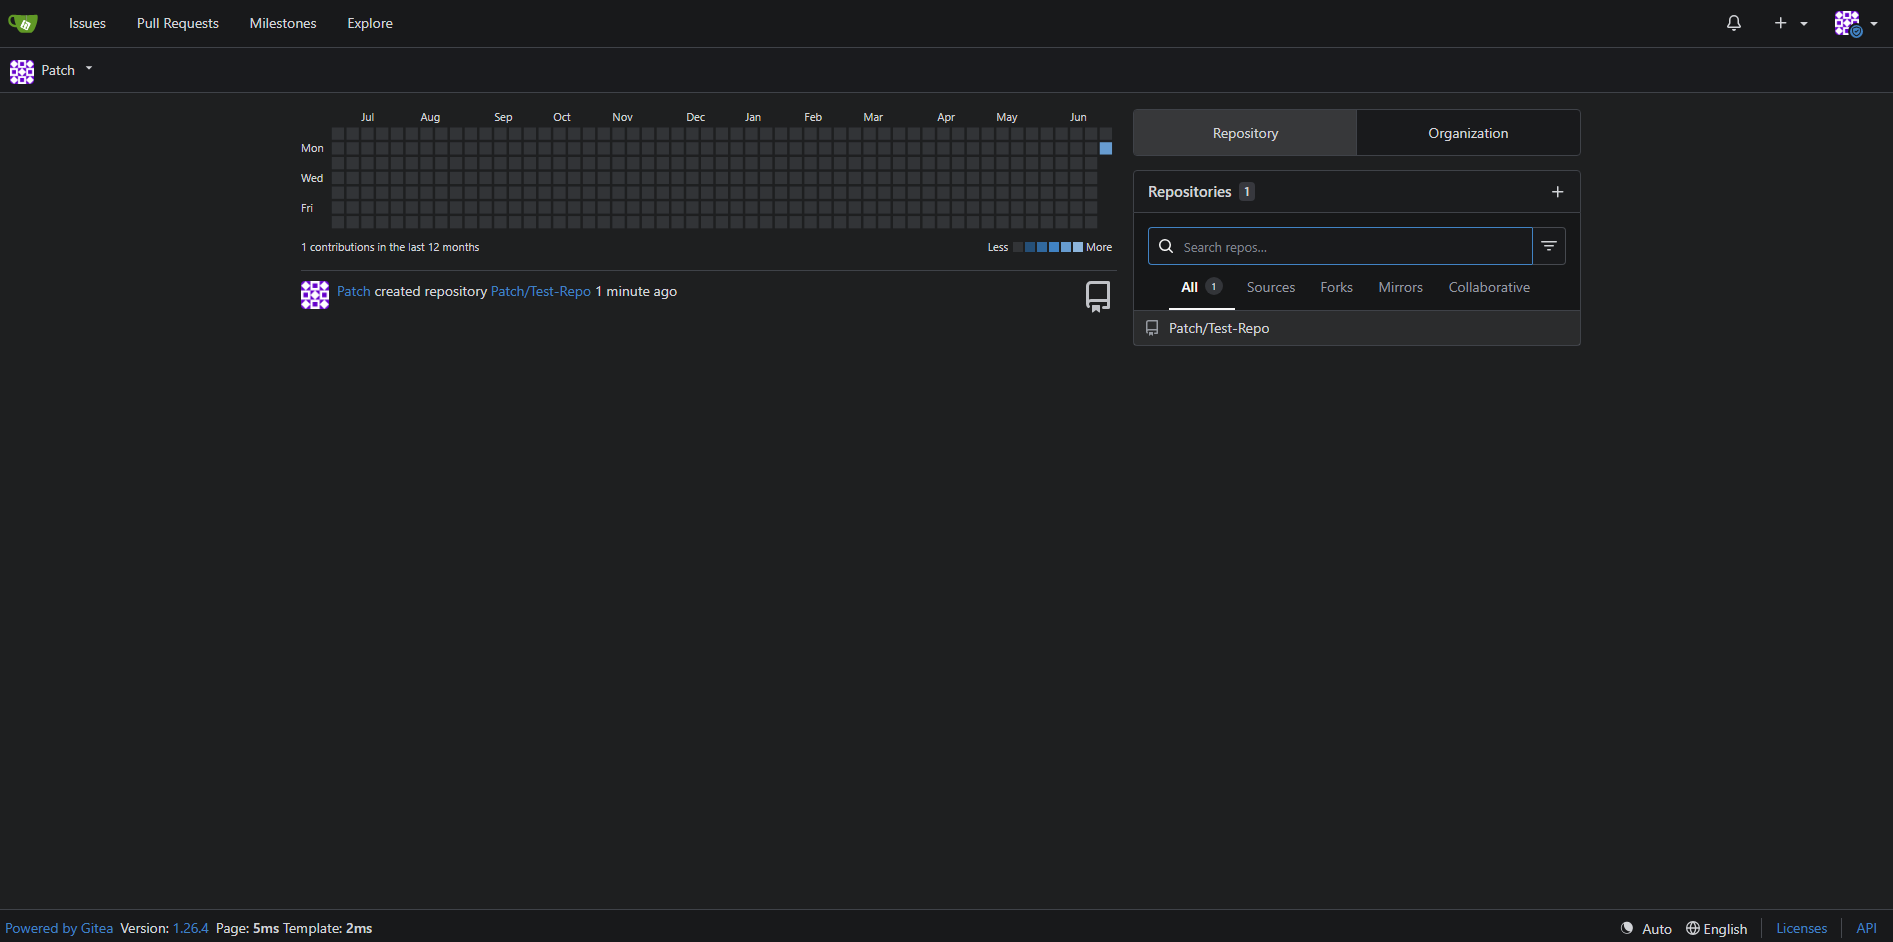
Step 10: Check the SSH clone URL format
If you create a test repository, the SSH clone URL should look something like this:
git@YOUR_SERVER_IP:2222/your-user/your-repo.git
If you used a domain, the same pattern applies:
[email protected]:2222/your-user/your-repo.git
That :2222 part matters because your host machine is almost certainly still using port 22 for normal server SSH.
Optional: Put Gitea behind a reverse proxy later
This guide keeps the first deployment simple by exposing port 3000 directly. Once the base install works, the nicer long-term path is usually a real domain and HTTPS in front of it.
When you are ready, these guides pair well with Gitea:
If you change the public URL later, update GITEA_DOMAIN and GITEA_ROOT_URL in .env, then recreate the container so Gitea advertises the correct links.
How to update Gitea later
When a new stable tag is available, update the image tag in compose.yaml and then run these commands from /opt/gitea.
docker compose pull
docker compose up -d
Gitea's Docker docs also stress the obvious but important point here: keep your data outside the container, which this guide does with a persistent volume.
What to back up
For this setup, the important asset is the Docker volume named gitea_data.
You can confirm it exists like this:
docker volume ls
That volume contains the data you actually care about, including repositories and the SQLite-backed application state for this first deployment.
Common problems and quick fixes
The container starts, but the page does not load
Check whether Gitea is actually listening.
docker compose ps
Then check the recent logs.
docker compose logs --tail=100 gitea
Also make sure your server firewall allows the web port you mapped.
The browser works, but SSH clone URLs are wrong
This usually means one of these settings is mismatched:
GITEA_DOMAINGITEA_ROOT_URLGITEA_SSH_PORT
Open .env, fix the values, and recreate the container.
docker compose up -d
Gitea advertises port 22 instead of 2222
Double-check that both of these are true:
the Compose port mapping uses
"2222:22"GITEA__server__SSH_PORT=${GITEA_SSH_PORT}is present
If either is missing, the UI can show clone instructions that do not match reality.
The container restarts with listen tcp :22: bind: address already in use
That usually means the Compose file enabled GITEA__server__START_SSH_SERVER=true.
In this Docker image, that is the wrong choice for the simple setup in this guide because the container already has its own OpenSSH service listening on port 22.
Fix it like this:
remove
GITEA__server__START_SSH_SERVER=truefromcompose.yamlkeep the port mapping as
"2222:22"keep
GITEA__server__SSH_PORT=${GITEA_SSH_PORT}so clone URLs still show2222recreate the container
docker compose up -d
I want PostgreSQL instead of SQLite
That is a reasonable next step for a busier instance, but it is a different shape of setup than this beginner-first article. Gitea's Docker docs include PostgreSQL and MySQL variants when you are ready to move up a level.
Where to go next
Once Gitea is running, the next useful improvements are usually:
adding HTTPS with a reverse proxy
setting up email for notifications and password recovery
creating a backup routine for the persistent volume
deciding whether you want to stay on SQLite or move to PostgreSQL later
You may also want these follow-ups from the rest of the site:
How to Install Docker on Ubuntu and Run Your First Container
Docker Compose for Self-Hosted Apps: A Beginner-Friendly Guide
Final thoughts
Gitea is a great fit when you want your own Git forge without turning the host machine into a monument to overkill. With Docker Compose and a persistent volume, the first deployment is surprisingly approachable, and it gives you a clean base for private repos, small team work, and future upgrades.
Frequently Asked Questions
Is SQLite good enough for a first Gitea install?
Why does this guide use port 2222 for Git over SSH?
What should I back up for Gitea?
Was this article helpful?
Let me know so I can keep improving.