Nginx Proxy Manager is one of the easiest ways to stop juggling ugly :3000 and :8080 URLs on self-hosted apps. Instead of hand-editing reverse proxy config files right away, you get a browser-based dashboard that helps you point a domain at an app, add HTTPS, and keep several services organized without turning your evening into an accidental Nginx certification course.
In this guide, you will install Nginx Proxy Manager with Docker Compose, open the admin interface, understand what the key ports and folders do, and create the foundation you will use for cleaner app URLs later.
Why self-host Nginx Proxy Manager?
If you run more than one web app, a reverse proxy quickly goes from “nice later” to “please save me now.”
Nginx Proxy Manager helps because it gives you:
one place to manage public-facing app domains
free HTTPS certificates through Let's Encrypt
a simpler UI for forwarding traffic to apps on different local ports
access lists, redirects, and a few other practical controls
less manual Nginx editing when you are still learning the basics
The official project describes it as a pre-built Docker image that makes it easier to forward traffic to your sites and apps, including free SSL, without needing deep Nginx knowledge first. That beginner-friendly angle is exactly why it belongs early in a self-hosting stack.
Is a VPS a good fit for Nginx Proxy Manager?
Usually, yes.
A small VPS is enough for many beginner setups if your main job is:
receiving traffic on ports 80 and 443
forwarding requests to a handful of self-hosted apps
requesting and renewing HTTPS certificates
You may want a larger server later if the same box is also running several heavier apps, databases, or media services. But for getting started, Nginx Proxy Manager itself is not usually the thing that crushes your server.
Docker also makes this easier because the official project already ships as a container image and publishes a straightforward Compose example.
What you'll need
Before you start, have these ready:
a VPS or server running Linux
SSH access to the server
a user account with sudo access
Docker installed and working
ports 80 and 443 available on the server
a domain name you can point at the server later
one web app to proxy eventually, such as something running on port 3000 or 8080
If Docker is not installed yet, start here first:
Reality check: Nginx Proxy Manager does not magically make a domain work if your DNS is wrong or your router/firewall blocks ports 80 and 443. It makes the proxy side much easier, but the surrounding network pieces still matter.
Before you start
All commands in this tutorial are run on your server over SSH, not on your home laptop unless that laptop is the machine hosting your apps.
If you are brand new to this, the flow is:
connect to the server with SSH
create an app folder
start the Docker Compose stack
open the web UI in your browser
later, point a domain at your server and create proxy hosts
For a first install, the simplest path is the official SQLite-backed setup. The Nginx Proxy Manager docs also show MySQL and MariaDB options, but SQLite is the more beginner-friendly starting point unless you already know you need a separate database.
How the official quick-start is structured
The project's official README shows a very small Compose stack with:
the
jc21/nginx-proxy-manager:latestimageports
80,81, and443a
datavolume for app dataa
letsencryptvolume for certificates
The setup docs also mention an optional DB_SQLITE_FILE setting and an optional DISABLE_IPV6 flag if IPv6 is not enabled on your host.
I prefer that beginner path: start with the simple stack first, confirm the dashboard loads, and only then get fancy.
Step 1: Connect to your server
Use SSH from your local machine.
ssh your-user@your-server-ip
Replace:
your-userwith your Linux usernameyour-server-ipwith your server's public IP address
If this is your first login, SSH may ask whether you trust the host fingerprint. That is normal on the first connection.
If this fails with Permission denied, double-check the username, SSH key, or password you are using.
Step 2: Update package lists on the server
Refresh the server before adding more moving parts.
sudo apt update
If your server also has pending package upgrades, install them.
sudo apt upgrade -y
This helps reduce the chance that you debug something weird later that is really just an outdated base system.
Step 3: Create a folder for Nginx Proxy Manager
Keeping each app in its own folder makes updates and backups much less annoying.
sudo mkdir -p /opt/nginx-proxy-manager
Now move into that folder.
cd /opt/nginx-proxy-manager
If you created the folder with sudo, give your normal user ownership so you can edit files without fighting permissions all day.
sudo chown "$USER":"$USER" /opt/nginx-proxy-manager
Step 4: Create folders for app data and certificates
The official examples persist Nginx Proxy Manager data and Let's Encrypt files outside the container.
mkdir -p data letsencrypt
Those folders matter because they hold the settings and certificates you do not want to lose every time a container is recreated.
Step 5: Create the compose.yaml file
Create the Compose file with the official quick-start shape.
cat > compose.yaml <<'EOF'
services:
  app:
    image: docker.io/jc21/nginx-proxy-manager:latest
    restart: unless-stopped
    ports:
      - "80:80"
      - "81:81"
      - "443:443"
    environment:
      TZ: "Etc/UTC"
      # Uncomment this if you want to change the SQLite DB file location:
      # DB_SQLITE_FILE: "/data/database.sqlite"
      # Uncomment this if IPv6 is not enabled on your host:
      # DISABLE_IPV6: "true"
    volumes:
      - ./data:/data
      - ./letsencrypt:/etc/letsencrypt
EOF
What each important part does
image: docker.io/jc21/nginx-proxy-manager:latest
This is the official Docker image used in the project's quick-start documentation.
Port 80:80
This handles normal HTTP traffic and is also important for some certificate validation flows.
Port 81:81
This is the admin dashboard port. The official README says to connect to port 81 for the admin interface after the container is running.
Port 443:443
This handles HTTPS traffic for the sites and apps you proxy through Nginx Proxy Manager.
./data:/data
This stores application data, including the internal SQLite database in the default simple setup.
./letsencrypt:/etc/letsencrypt
This stores certificate material so renewals and existing certs survive container recreation.
TZ: "Etc/UTC"
Set your server timezone here if you want logs and timestamps to reflect your local region.
Step 6: Start Nginx Proxy Manager
Now start the stack.
docker compose up -d
Docker will pull the image the first time, so this may take a minute.
When it finishes, check the container state.
docker compose ps
You want to see the service running rather than crashing in a loop.
If it keeps restarting, check the logs next.
docker compose logs --tail=100
Step 7: Open the admin interface
Once the container is up, open this address in your browser to create the admin account and access the dashboard:
http://your-server-ip:81
If the page does not load yet, wait a moment and refresh. The official project notes that the first startup can sometimes take a little longer.
Now I am creating the admin user...
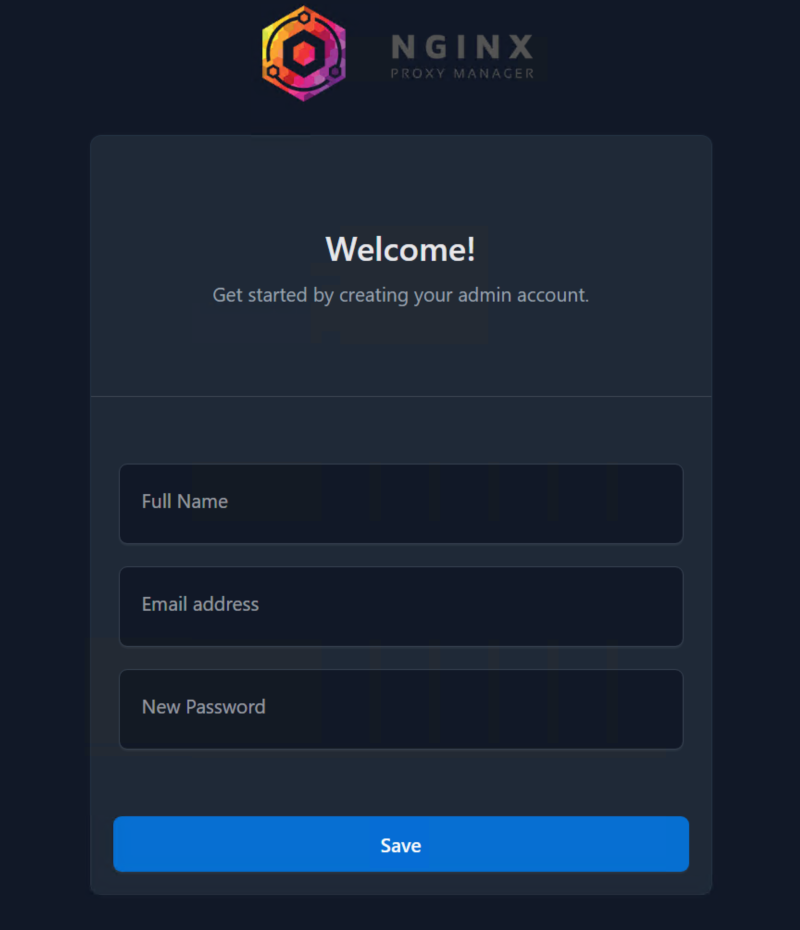
...and I am on the dashboard.

At this stage, your dashboard may still be using a raw IP address and the :81 port, which is fine. The point of this install is to get the management layer working before you ask it to front your other apps.
Step 8: Point your domain to the server
Before you can create a useful proxy host for app.yourdomain.com, the DNS record needs to point at this server.
A common beginner setup is:
create an
Arecord for a subdomain likeapp.yourdomain.compoint it to your server's public IPv4 address
wait for DNS to update
If your DNS is not pointing at the server yet, Nginx Proxy Manager cannot finish the illusion of effortless magic because the internet still needs to know where your server lives.
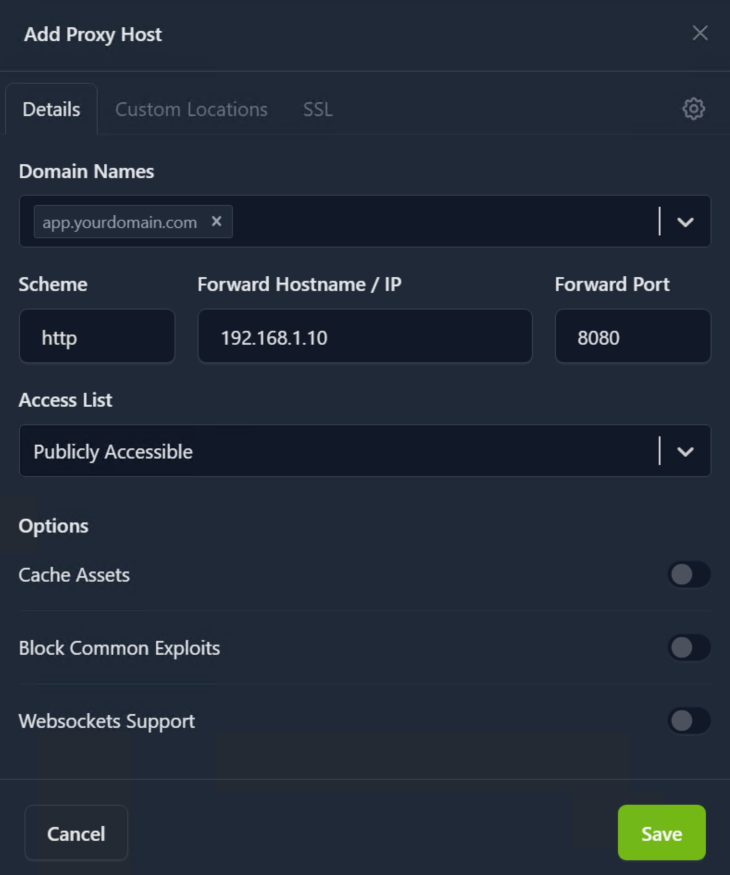
Step 9: Create your first proxy host
Once the dashboard opens and DNS is ready, you can add a proxy host for one of your apps.
The basic idea is:
domain:
app.yourdomain.comforward hostname or IP: the machine running the target app
forward port: the app's local port, such as
3000,8080, or8096scheme: usually
httpfor many internal app containers
This is the first moment where Nginx Proxy Manager becomes genuinely satisfying. Your messy internal app port stays messy on the inside, and your public-facing URL becomes civilized.
Step 10: Request HTTPS with Let's Encrypt
After your domain resolves correctly, open the SSL options for the proxy host and request a certificate.
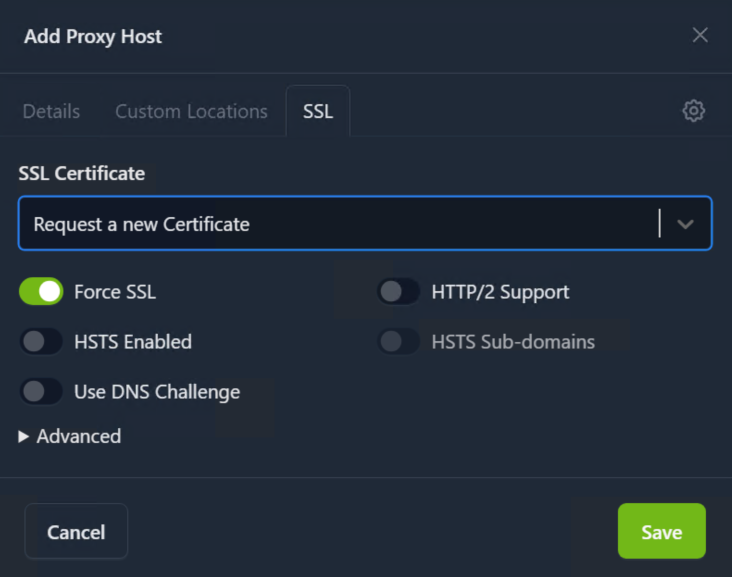
In plain English, that means:
tell Nginx Proxy Manager which domain belongs to this app
let it prove domain control through the normal validation flow
have it create and renew a certificate for you
If this step fails, the most common causes are:
DNS is not pointing at the server yet
ports 80 or 443 are blocked
another service is already occupying those ports
the domain record is wrong
Optional: Use a dedicated database later
The official setup docs also show MySQL and MariaDB examples.
That path can make sense if you:
already run a small database stack for other services
want more control over how Nginx Proxy Manager stores data
are building a more customized environment
For a first deployment, though, the default SQLite-backed setup is simpler and usually the better call.
Common problems and quick fixes
Port 80 or 443 is already in use
Check what is listening first.
sudo ss -tulpn | grep -E ':80|:81|:443'
If Apache, plain Nginx, or another reverse proxy is already bound to those ports, stop or rework that service before expecting Nginx Proxy Manager to start cleanly.
The admin page on port 81 will not open
First confirm the container is still running.
docker compose ps
Then inspect recent logs.
docker compose logs --tail=100
Also confirm your VPS firewall or cloud provider firewall allows the traffic you expect.
HTTPS certificate requests fail
Usually this is a DNS or port-reachability issue, not a mysterious curse from the certificate gods.
Check that:
the domain resolves to your server's public IP
ports 80 and 443 are open
your router is forwarding those ports correctly if this is a home setup
you did not point the domain at the wrong host
The proxied app itself does not load
Make sure the target app is actually reachable from the Nginx Proxy Manager host on the forward port you entered.
For example, if your app is supposed to be on port 3000, test that locally on the server first.
curl http://127.0.0.1:3000
If that fails, the problem is probably the app or container behind the proxy, not Nginx Proxy Manager itself.
How to update Nginx Proxy Manager
A safe routine update looks like this.
Pull the latest image.
docker compose pull
Recreate the stack with the new image.
docker compose up -d
Confirm it is healthy afterward.
docker compose ps
Because your data and certificates live in mounted folders, this update flow is much less scary than manually reinstalling everything.
How to back it up
For a simple deployment, the most important things to back up are:
/opt/nginx-proxy-manager/data/opt/nginx-proxy-manager/letsencrypt
Those folders hold the app data and certificate files that make your setup worth keeping.
A straightforward archive example looks like this:
sudo tar -czf /root/nginx-proxy-manager-backup.tar.gz /opt/nginx-proxy-manager/data /opt/nginx-proxy-manager/letsencrypt
If you are already backing up your entire app directories, make sure these paths are included.
How to remove it
If you decide you do not want Nginx Proxy Manager on this server after all, stop and remove the stack.
docker compose down
If you also want to delete the persisted data and certificates, remove the folders afterward.
rm -rf /opt/nginx-proxy-manager/data /opt/nginx-proxy-manager/letsencrypt
Only run that second command if you are sure you no longer need the saved configuration or certificates.
You're done
You now have Nginx Proxy Manager running in Docker Compose, with persistent storage for app data and certificates, and a dashboard ready to manage reverse proxy rules. The next practical step is to put one real app behind it, request HTTPS, and start replacing those awkward port-number URLs with proper domains that look like you planned this all along.