n8n is one of those tools that becomes dangerously useful once you have it running. It gives you a visual way to connect apps, APIs, schedules, and small bits of logic so repetitive work stops camping on your calendar. For a self-hosting site, it is a strong tutorial because the first successful workflow usually makes the value obvious in about five minutes.
In this guide, you will deploy n8n with Docker Compose on a Linux server, keep its important data persistent, complete the first-run owner setup, and build a tiny starter workflow so the install feels like an actual tool instead of a decorative container.
Why self-host n8n?
n8n is a workflow automation platform. In plain English, that means it can watch for an event, do something with the data, and send the result somewhere else without you manually bouncing between tabs like an underpaid API courier.
Self-hosting it is attractive because you get:
control over your workflow data and credentials
the ability to connect internal or private services without sending everything to a third-party SaaS platform
flexible automation for homelabs, side projects, and small teams
AI-friendly workflow options later if you want to connect local models or hosted AI APIs
a tool that starts simple but can grow into much fancier workflows later
Is a VPS a good fit for n8n?
Usually, yes.
A small VPS is enough for a beginner deployment if you are learning the interface, building a few scheduled tasks, or wiring together lightweight webhooks and app integrations. If you expect lots of executions, large teams, or heavier production traffic, you will eventually want to think about PostgreSQL, queues, workers, and more careful scaling.
For a first install, Docker Compose is a good fit because the official n8n Docker image is straightforward and the official docs show persistent data living in /home/node/.n8n. That directory matters because it stores the SQLite database, the encryption key used for credentials, and other settings you do not want to lose.
What you will need
Before you start, have these ready:
a Linux server or VPS
SSH access to that server
Docker already installed and working
the Docker Compose plugin available as
docker composea few spare minutes and a mild willingness to automate your future chores
If Docker is not ready yet, use these first:
How to Install Docker on Ubuntu and Run Your First Container
Docker Compose for Self-Hosted Apps: A Beginner-Friendly Guide
Before you start
All commands in this tutorial run on your server over SSH.
This article uses a simple beginner-friendly Compose deployment first. That gets n8n running quickly with persistent storage and a direct browser URL on port 5678.
Because this first pass uses a plain IP address over HTTP, the Compose file below sets N8N_SECURE_COOKIE=false before the first container start. Without that setting, n8n can refuse the browser login flow on a raw IP URL and show the secure-cookie warning instead.
If you later want a proper domain, HTTPS, and webhook-friendly public access, add a reverse proxy after the base install works:
Important: The official n8n Docker docs warn that even if you later switch to PostgreSQL, you still need to persist
/home/node/.n8nbecause it contains essential instance data such as the encryption key used to protect saved credentials.
What this Docker Compose setup includes
The stack in this guide uses:
the official
docker.n8n.io/n8nio/n8nimagea named Docker volume for
/home/node/.n8na bind mount for a local
./local-filesdirectoryport
5678for the web interfacetimezone variables so schedules make more sense later
N8N_SECURE_COOKIE=falseso the first login works on a raw server IP over HTTPthe
N8N_ENFORCE_SETTINGS_FILE_PERMISSIONS=truesetting recommended in the official docs
This is intentionally simpler than the full official HTTPS-plus-Traefik production example, but it stays aligned with the core Docker guidance from the project.
Step 1: Connect to your server
Use SSH from your local machine.
ssh your-user@your-server-ip
Replace your-user with your Linux username and your-server-ip with your server's public IP address.
If this is your first login, SSH may ask you to confirm the host fingerprint. That is normal.
Step 2: Create a folder for n8n
Create a dedicated app directory so everything stays in one place.
sudo mkdir -p /opt/n8n
Now give your normal user ownership of it.
sudo chown "$USER":"$USER" /opt/n8n
Move into the directory.
cd /opt/n8n
Step 3: Create the shared files folder
The official Docker Compose examples include a local files mount, which is handy if you want workflows to read from or write to files on disk.
mkdir -p local-files
Step 4: Create the compose.yaml file
Save the following Compose file as compose.yaml.
cat > compose.yaml <<'EOF'
services:
  n8n:
    image: docker.n8n.io/n8nio/n8n
    restart: unless-stopped
    ports:
      - "5678:5678"
    environment:
      - N8N_ENFORCE_SETTINGS_FILE_PERMISSIONS=true
      - N8N_SECURE_COOKIE=false
      - GENERIC_TIMEZONE=Etc/UTC
      - TZ=Etc/UTC
    volumes:
      - n8n_data:/home/node/.n8n
      - ./local-files:/files

volumes:
  n8n_data:
EOF
What the important lines do
image: docker.n8n.io/n8nio/n8n
This pulls the official n8n Docker image.
5678:5678
n8n listens on port 5678, which is the default web interface port used in the project documentation.
n8n_data:/home/node/.n8n
This is the most important persistent path in the stack. It stores the SQLite database, the encryption key for credentials, and other instance settings.
./local-files:/files
This gives n8n a shared folder for reading or writing files from workflows. Inside n8n, that path appears as /files.
N8N_ENFORCE_SETTINGS_FILE_PERMISSIONS=true
The official examples set this to make sure the settings file permissions are handled more safely.
N8N_SECURE_COOKIE=false
This matters for the beginner setup in this article. When you open n8n directly on http://YOUR_SERVER_IP:5678, the default secure-cookie behavior can block the login flow because the URL is not HTTPS. Setting N8N_SECURE_COOKIE=false before the first container start avoids that problem for a raw-IP HTTP install.
Once you move n8n behind a real domain and HTTPS, remove this override and let secure cookies stay enabled again.
GENERIC_TIMEZONE and TZ
These help n8n schedules and container time output match the timezone you want. If you need a different timezone, change both values to something like America/New_York or Europe/Berlin.
Step 5: Start n8n
Before you start the container, make sure N8N_SECURE_COOKIE=false is already present in the Compose file if you plan to open n8n on a raw server IP over plain HTTP.
Launch the stack from /opt/n8n.
docker compose up -d
The first run downloads the image, so it may take a minute.
Step 6: Check that the container is running
docker compose ps
You should see the n8n service in a running state.
If it exits right away, check the logs.
docker compose logs --tail=100 n8n
Step 7: Open the n8n web interface
Visit the server in your browser on port 5678.
http://YOUR_SERVER_IP:5678
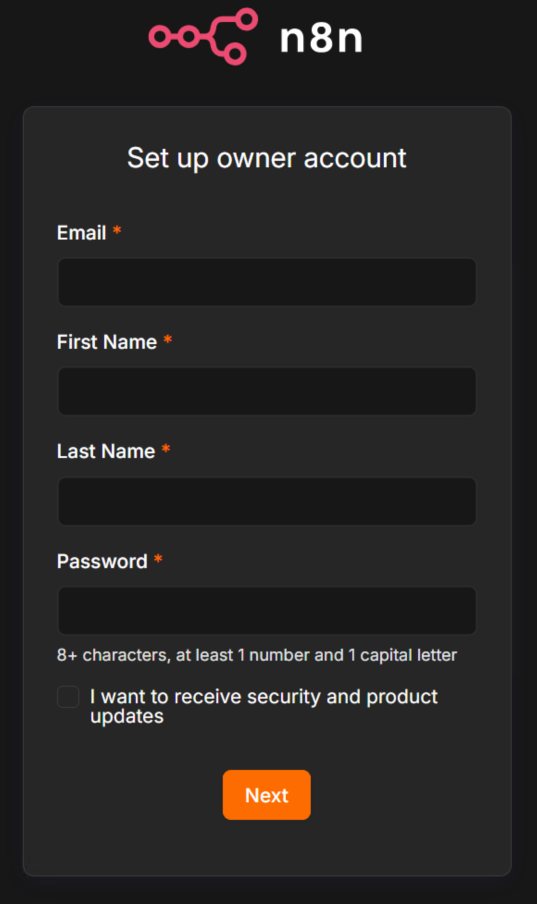
On first launch, n8n should open its setup flow so you can create the initial owner account.
If you see the message about n8n being configured to use a secure cookie while you are visiting over an insecure URL, stop here and fix the Compose file first:
add
N8N_SECURE_COOKIE=falseunder theenvironment:sectionrecreate the container:
docker compose down
docker compose up -d
Then refresh the page.
If the page does not load, check whether your VPS firewall or cloud firewall is blocking port 5678.
Step 8: Complete the first-run setup
Create your owner account in the browser and sign in.
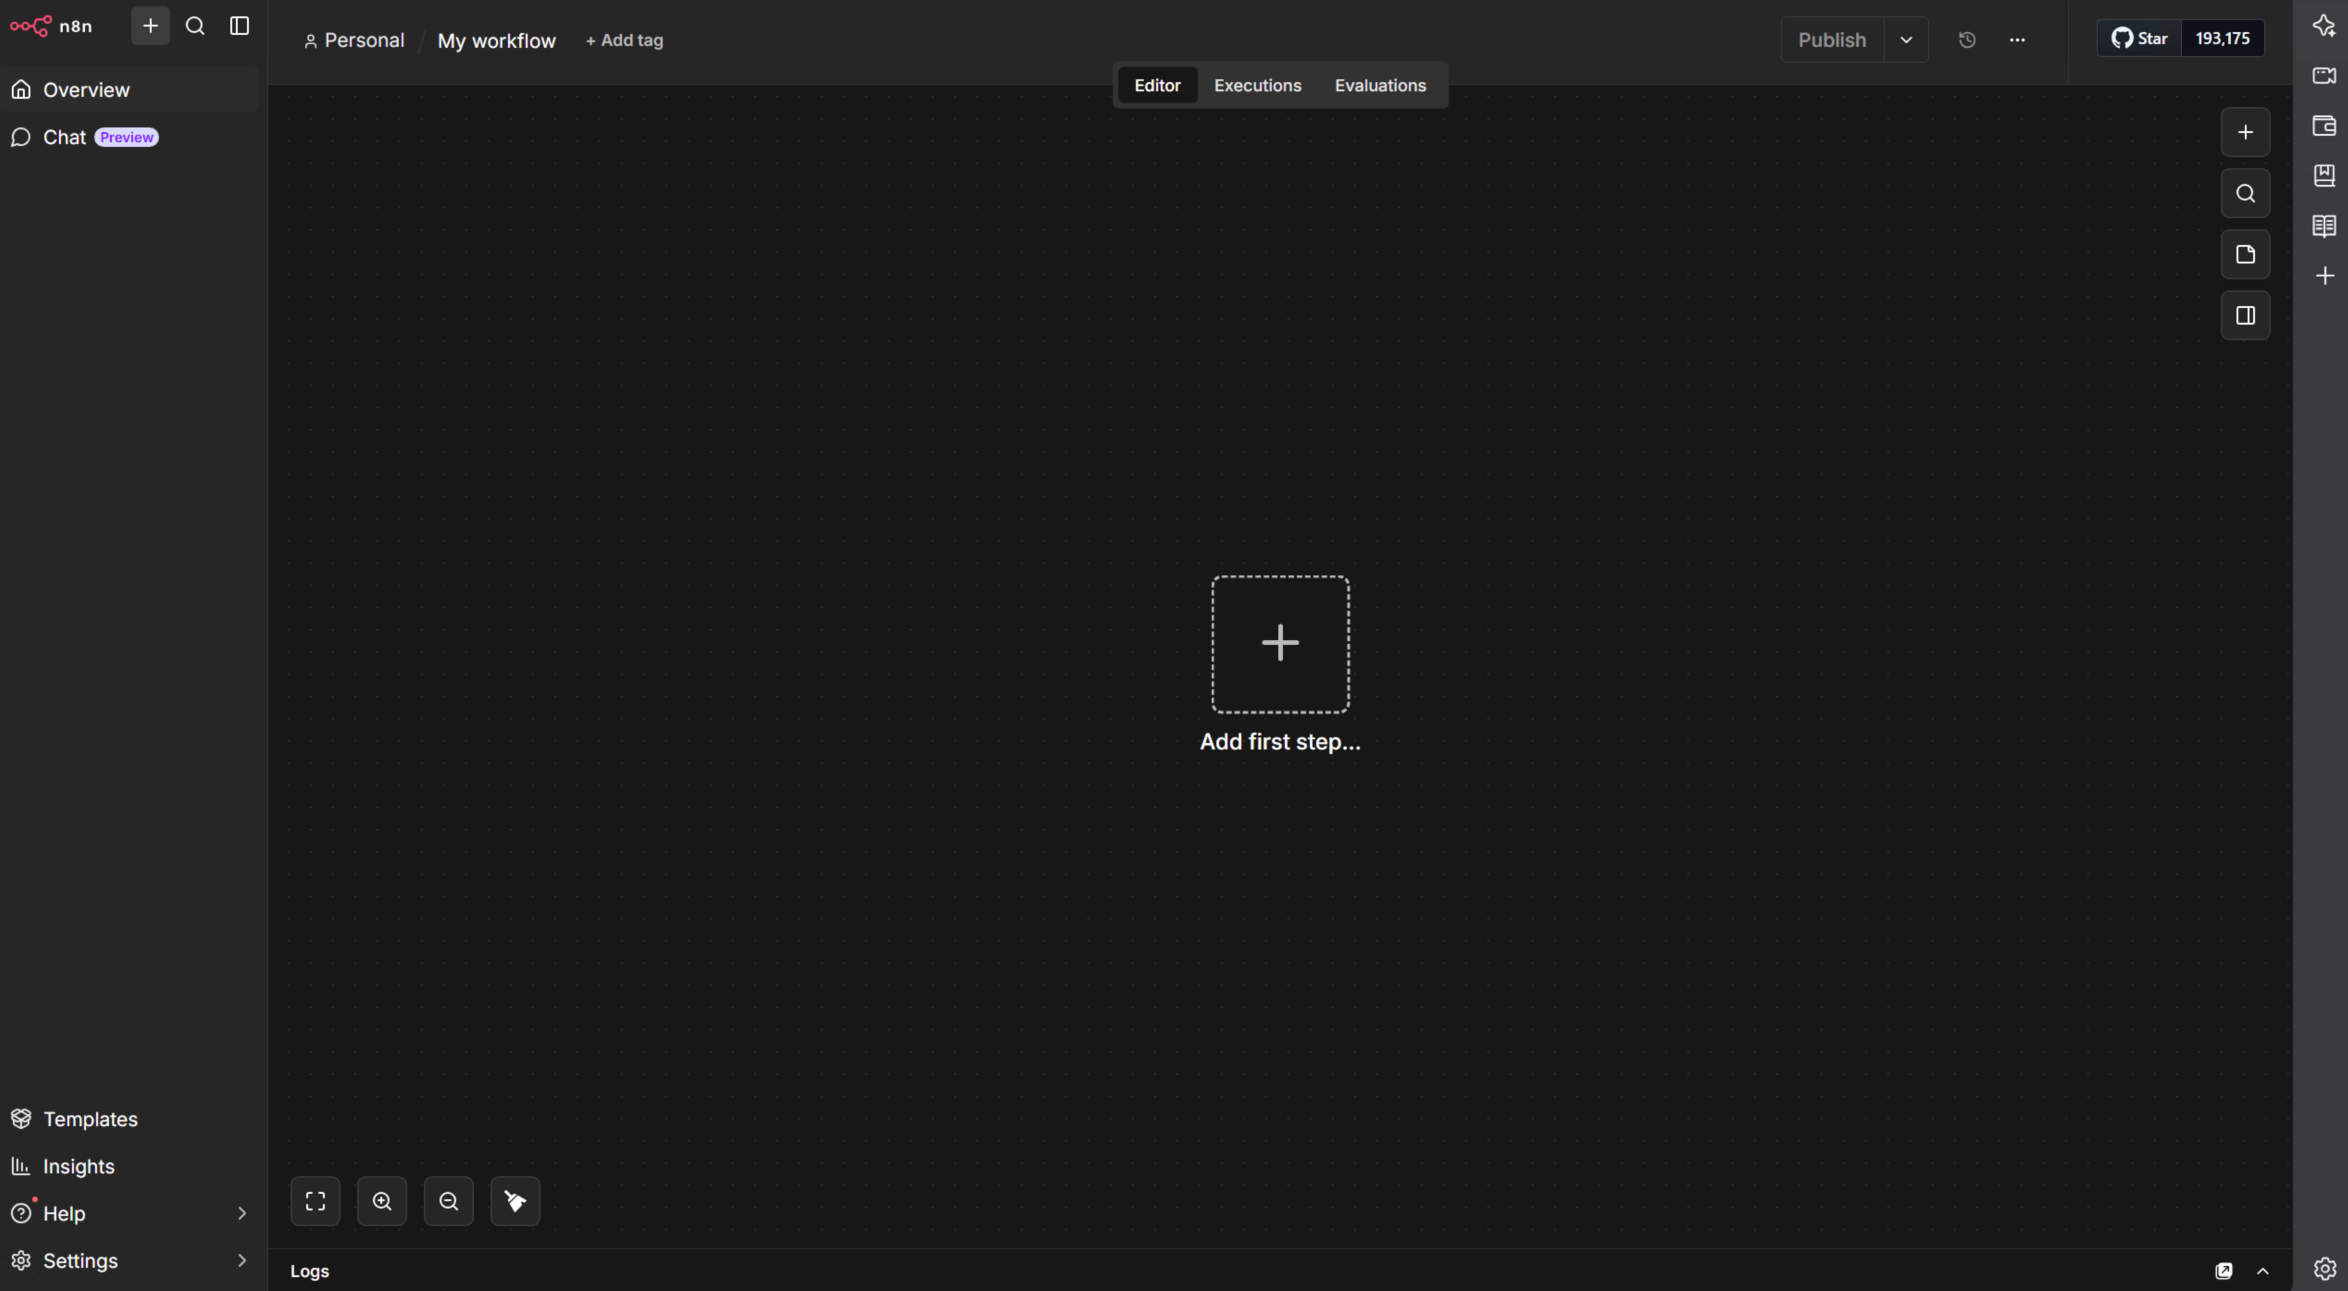
After login, you should land in the main n8n editor.
If you plan to expose n8n on the public internet, do not stop at a raw IP address forever. Add a reverse proxy and HTTPS once you confirm the container works.
Step 9: Create a tiny test workflow
You do not need a giant automation on day one. A tiny success is enough.
Inside the editor:
create a new workflow
add a Manual Trigger node
add an Edit Fields node or another simple node that returns sample data
connect the nodes
run the workflow manually
save the workflow
That proves the editor is working and that your instance can execute a basic workflow.
Optional: Put n8n behind a domain and HTTPS
For learning, a direct server IP is fine, but that is also why this guide temporarily sets N8N_SECURE_COOKIE=false for the HTTP-only first pass.
For long-term use, especially if you want incoming webhooks from other services, a domain and HTTPS are the better path. The official n8n Docker Compose server setup examples use values like these when the app sits behind a reverse proxy:
N8N_HOST=n8n.example.comN8N_PORT=5678N8N_PROTOCOL=httpsWEBHOOK_URL=https://n8n.example.com/NODE_ENV=production
That is why reverse proxy tutorials are a useful follow-up once the base install is working:
Common problems and quick fixes
The page will not open on port 5678
Check that the container is running.
docker compose ps
Then confirm the port mapping exists.
docker compose port n8n 5678
If the container is healthy but the page still does not open, check your server firewall or cloud firewall rules.
The container keeps restarting
Read the logs.
docker compose logs --tail=100 n8n
Common causes include permission issues, a broken Compose file, or a conflict with another service already using port 5678.
I get a secure cookie warning instead of the setup page
That usually happens when you open n8n on http://YOUR_SERVER_IP:5678 without setting N8N_SECURE_COOKIE=false first.
Update the Compose file, then recreate the container:
docker compose down
docker compose up -d
If you later move to a proper HTTPS domain, remove that override and use secure cookies normally again.
I changed database settings later and old credentials broke
That usually means the persistent n8n settings directory was lost, recreated, or not mounted correctly. The encryption key lives in /home/node/.n8n, so that path must remain persistent across restarts and upgrades.
My webhooks use the wrong URL
If you move n8n behind a reverse proxy or custom domain, update the environment so it matches the final URL. In the official examples, that means setting N8N_HOST, N8N_PROTOCOL=https, and WEBHOOK_URL=https://your-domain/.
How to update n8n
Pull the latest image for your stack.
docker compose pull
Stop and remove the old container while keeping your persistent data.
docker compose down
Start the updated version.
docker compose up -d
This follows the same general Compose update flow shown in the official Docker image documentation.
How to back up n8n
The most important thing to back up is the persistent n8n data volume.
Create a quick backup archive from the volume contents.
docker run --rm -v n8n_data:/source -v "$PWD":/backup alpine tar czf /backup/n8n-data-backup.tar.gz -C /source .
If you are using the shared files directory for workflow imports, exports, or generated files, back that up too.
tar czf n8n-local-files-backup.tar.gz local-files
How to remove n8n
Stop and remove the stack.
docker compose down
If you also want to delete the persistent application data, remove the Docker volume.
docker volume rm n8n_data
If you mounted files in local-files and want everything gone, delete the project folder too.
cd /opt
rm -rf /opt/n8n
Be careful with that last command. It is very effective at making the folder stop existing.
You’re done
You now have n8n running with Docker Compose, persistent instance data, and a working browser login on your server.
From here, the best next steps are:
move n8n behind HTTPS with a reverse proxy if you plan to expose it publicly
start building real workflows for notifications, backups, or app integrations
keep the
/home/node/.n8ndata safe so credentials and instance settings survive upgrades
Once the base install is solid, good follow-up articles would be reverse proxying n8n, backing it up automatically, or connecting it to other self-hosted tools in your stack.